

You do not need a greenhouse, designer grow lights, or a seed-starting station that looks like a science lab. You need three things to win at indoor seed-starting:
- Enough light
- Clear labels
- A simple routine you will actually follow
That is it. When people struggle with seedlings, it is usually because one of those three went sideways - most often the light.
Let’s build a setup that is cheap, simple, and boringly successful.
What you actually need (the short list)
Here is the no fancy stuff starter kit:
- A flat surface near an outlet (table, shelf, folding table)
- Seed trays or small cups with drainage (anything that drains works)
- Seed-starting mix (lighter than potting soil, drains better)
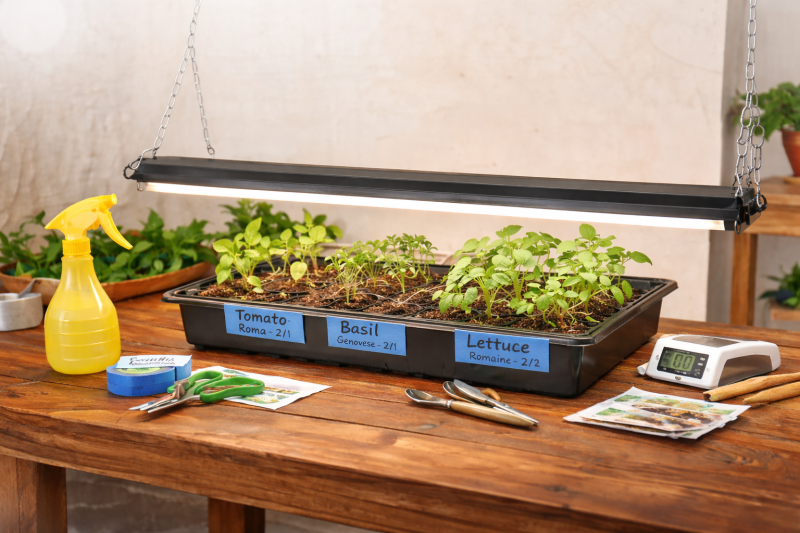
- A light source (shop light or basic LED grow light)
- Something to label with (painter’s tape plus a marker works great)
- A spray bottle or small watering can
Optional but helpful:
- A heat mat (only if your house is cool)
- A clear cover (plastic dome, plastic wrap, or a clear bin)
If you want to keep it extra simple: start with tomatoes, peppers, basil, and lettuce. They are beginner-friendly (especially tomatoes and lettuce), and you will actually use them in meals.
Step 1: Pick your spot (do not overthink it)
Choose a place you can check daily without it being annoying.
Good spots:
- Laundry room counter
- Spare room table
- Kitchen corner table (if you have space)
- Garage or basement only if it stays warm enough
Avoid:
- A windowsill as your only light source
- Cold drafts (by doors, leaky windows)
- Places you will forget exist
Step 2: Lights - the #1 difference between meh and wow
The truth about windows: a sunny window feels bright to us, but seedlings often do not get enough strong, direct light for long enough. The result is the classic problem: seeds sprout, then seedlings stretch and flop over (leggy).
If you want sturdy seedlings with thick stems, use a light.
The easiest budget light setup:
- Option A: LED shop light (best value) - hang it with chains, hooks, or strong string; put it on a timer.
- Option B: Simple LED grow light bar - it does not have to be expensive; full spectrum is fine but not required for beginners.
How close should the light be?
- Start with the light 2 to 3 inches above the seedlings.
- Raise it as they grow.
- Keep the light close enough that seedlings do not reach and stretch.
How long should lights stay on? Aim for 14 to 16 hours on and 8 to 10 hours off. Seedlings need darkness too. A cheap outlet timer makes this effortless.
Quick leggy seedling fix: move the light closer today, add gentle airflow, and (later) pot up tomatoes deeper since tomatoes can grow roots along the buried stem.
Step 3: Labels - future-you will thank you
This is the other big seed-starting heartbreak: three weeks later you are staring at mystery plants that all look the same.
The simplest label system that actually works:
- Option A: Painter’s tape plus marker - tape on the tray edge or cup; write Plant, Variety, Date (example: Tomato - Better Boy - 2/2).
- Option B: Plastic plant tags - use a permanent marker.
- Option C: Popsicle sticks - write clearly and push into the tray.
Bonus no drama label tip: also write your starts down in one place (a small notebook, a phone note, or a printable log) because labels fall off and ink fades.
Step 4: Watering - gentle and steady
Seed-starting is not the time for soak it once a week and forget it.
The goal: keep the soil evenly moist, not soggy.
- Too dry: seeds stall or die.
- Too wet: fungus, mold, and damping off (seedlings collapse at the base).
Easy watering rules:
- For tiny seedlings: use a spray bottle or gently water from the side.
- For bigger seedlings: bottom water (set the tray in a shallow pan of water for 10 to 15 minutes).
If the top looks dry but the tray feels heavy, do not water yet.
Step 5: Warmth - you may not need a heat mat
Most seeds sprout faster with warmth, but once seedlings are up, they are usually fine at normal indoor temperatures.
When a heat mat helps:
- Your room is consistently below about 68°F.
- You are starting heat-lovers like peppers and eggplant.
When you can skip it: your home stays comfortably warm or you are starting easier crops like lettuce, herbs, and tomatoes.
If you do use a heat mat: use it for germination, then turn it off once most seeds sprout so trays do not dry out too fast.
Step 6: Airflow - the secret weapon for sturdy stems
Seedlings grown indoors without airflow can be weak and floppy.
Easy fix: put a small fan nearby on low. Do not blast them like a wind tunnel - just gentle movement for a few hours a day. This helps prevent mold and makes stems stronger.
The simple daily routine (no overcomplicated systems)
Every morning (2 minutes):
- Check moisture (touch the soil).
- Look for sprouting.
- Make sure lights are on schedule.
Every 2 to 3 days (5 minutes):
- Rotate trays so growth stays even.
- Remove covers once most seeds sprout.
- Bottom water if needed.
Once a week (10 minutes):
- Thin crowded seedlings (snip extras with scissors).
- Check labels.
- Make a quick note of what is thriving and what is not.
Common problems (and the easy fixes)
- Seedlings are tall and falling over: not enough light. Fix: bring light to 2 to 3 inches above seedlings and add a fan.
- White fuzzy mold on soil: too wet and not enough airflow. Fix: let the surface dry a bit, add airflow, remove the humidity cover.
- Seedlings collapse at the base (damping off): overly wet conditions and poor airflow. Fix: prevent it - do not overwater, use airflow, clean trays.
- Leaves turning pale or yellow: usually needs nutrients after true leaves appear. Fix: start a very weak fertilizer (about 1/4 strength) once true leaves show.
No-fancy-stuff setup examples
Setup A: The cheapest win
- Plastic cups with holes in the bottom
- Seed-starting mix
- Painter’s tape plus marker
- 2-ft LED shop light plus timer
Setup B: Still simple, a little nicer
- Seed tray with cells
- Bottom tray for watering
- LED grow bar
- Small fan nearby
Either one can grow strong seedlings. The difference is consistency, not expensive gear.
Quick checklist before you start
- Trays/cups drain properly.
- Light is close enough (2 to 3 inches).
- Timer set for 14 to 16 hours.
- Labels include plant, variety, and date.
- Watering plan: moist, not soggy.
- Airflow added after sprouting.
Wrap-up: Keep it simple and you will win
Good light plus clear labels plus a simple daily check equals success.
Seed-starting should feel doable, not like a complicated hobby with a big price tag. The goal is healthy plants that end up in your garden - and later, in your kitchen.
Add comment
Comments